Fix a Disconnecting Wi-Fi Problem on Windows 10
Fix a Disconnecting Wi-Fi Problem on Windows 10
Do you have a windows 10 PC? Does it fail to connect with wi-fi? For sure, it is quite embarrassing. Here are 8 tips await to Fix Disconnecting Wi-Fi Problem on Windows 10. We will go through them.
The firm wi-fi connection is essential for the workers who use the internet for their tasks. In addition, unless your internet connection is stable and the provider is dependable, you may get into worst having not the proper internet connection to work with.
Perhaps, you may experience that PC disconnects from the wi-fi connection even without any reason. At a glance, the users put the blame on the accounts of the providers, but it may happen due to the case in users’ systems. So, we will elaborate on 8 tips to check the error and make a fruitful outcome.
Quick Checks to Fix Disconnecting Wi-Fi Problem on Windows 10
Initially, we will move with the network settings on your PC. First of all, go and check for the following to ensure the primary needs. It will save you time from making changes to the settings.
- Check if the airplane mode is on or not.
- Look for the status of the router,
- Physically damaged or not
- Accurately switched on or not.
- Whether The area you connect is out of service
- Distance between the PC and the network
Check for each and if you can not find a proper solution, restart the router. Normally, the very tip solves the problem. But, if you still struggle with the same issue, we will guide you to follow these tips to Fix Disconnecting Wi-Fi Problem on Windows 10
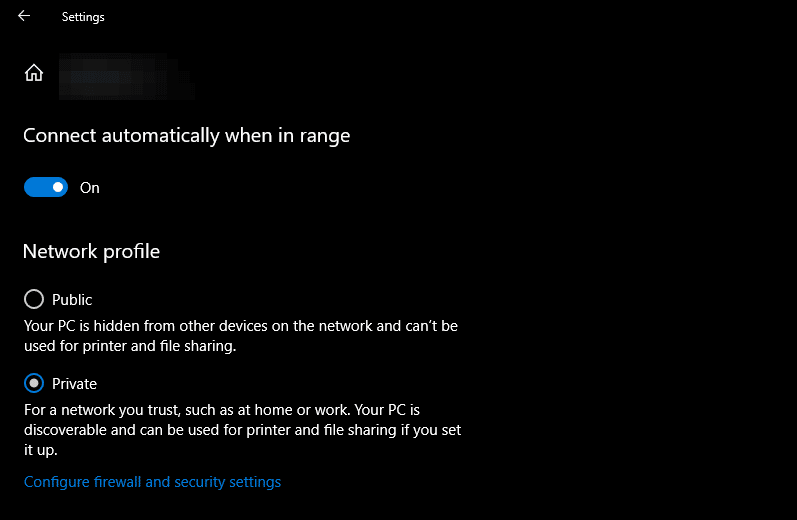
1. Set Your Network Settings to Private
Keeping the network’s public status brings you more damage. So, it will be better to make it private as a mandatory method. Do you know why it is dangerous to keep it public? the personal information is exposed to anyone, the tendency to get an attack from the hackers, come across with cyber-attacks, plus more cases could arise with it.
To avoid unnecessary problems, you may need to set the wi-fi connection to private. Follow the steps:
- Tap on the icon of wi-fi. Go to the taskbar > lower right corner.
- Look for the properties on the network
- Choose the network profile, PRIVATE.
2. Check if Unwanted Devices Are Hogging Your Bandwidth
Here is the most important point that grabs your attention, check whether outsiders are using your wi-fi connection. Imagine if you share the login details such as password with your friends, they may use your network. It may direct to slow down the PC speed to connect with. REFER: Why the wi-fi gets slow on the smartphone?
Moreover, imagine what would happen if any of your friends share the password with another one and if all of them connect by using your router. Quite a number of devices are connected to your router and the very situation directs to disconnect with some of the devices. Sometimes, your PC may enlist in the disconnected devices.
For sure, the method is awaiting to serve you better outcome. You can look the which device is connected with your router. if you need you can make the changes in the password. Then, no one can interfere with the router.
- Let us move on to the steps:
navigate to the URL 192.168.1.1 in your router (it may depend on the type of the router you use) - Log in with your details.
- You may see the “connected devices” page. It shows you the devices that are connected to your router. You better ensure if the unusual devices are connected. Then, move to the next step.
- Look for WLAN and go to WLAN Basic Configuration.
- Make the changes in WPA PresharedKey.
- Then, feed the password. Tap on Apply.
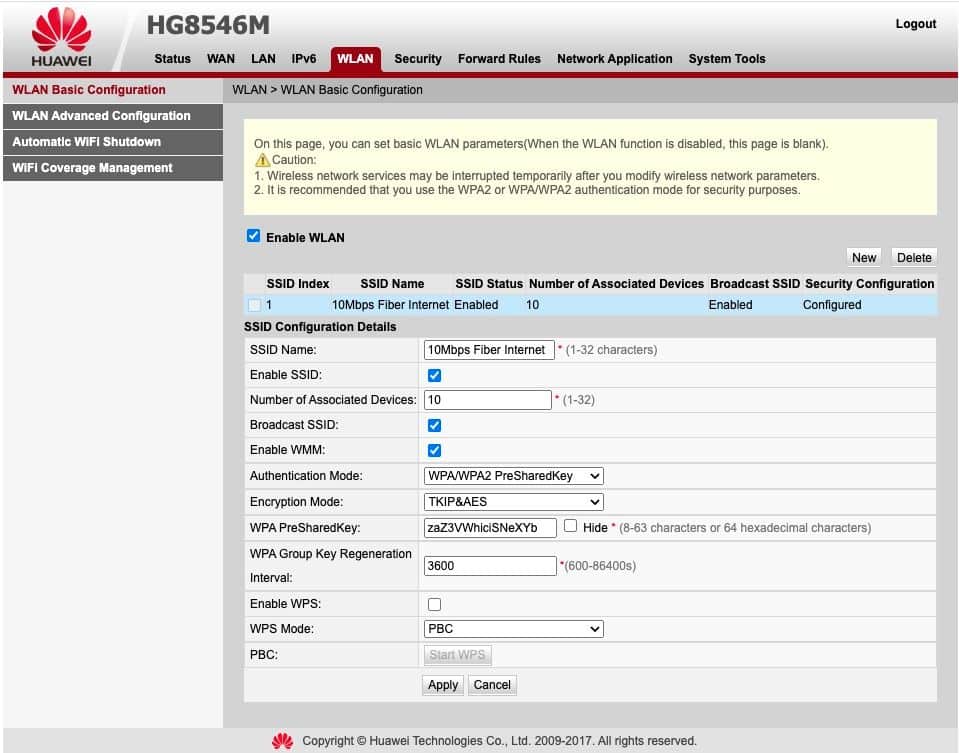
The terms to direct the steps may vary according to the router but keep in mind that the same steps will be given with a sort of variety.
3. Update Your Wi-Fi Adapter’s Driver
Sometimes, you may not aware that the driver of the wi-fi adapter is old to perform the task. So, in those situations, you need to either update the drivers or install them back. Normally, most of the drivers get up to date automatically when the windows update, but it may not properly proceed at times. You better make sure the update accurately happens. Here are the steps:
- Go to device manager.
- Navigate to Network adapters
- Tap on the right of the wi-fi adapter
- Click on update driver.
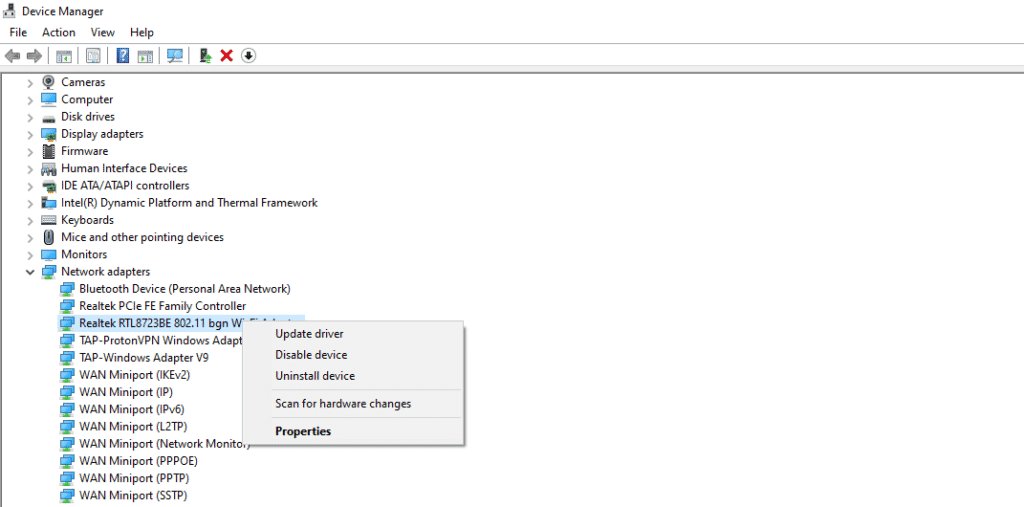
Moreover, if the issue prevails, try to install the driver back.
4. Change the Network Adaptor Properties
Further, the power management settings may interfere with the performance of the wireless adapter. So, check it by altering the settings of the Wireless Network Adapter.
Go to device manager. Look for the network adapter. Double-tap on the adapter name. then, its’ properties will visible. Uncheck the Power Management tab > Allow the computer to turn off this device to save power.
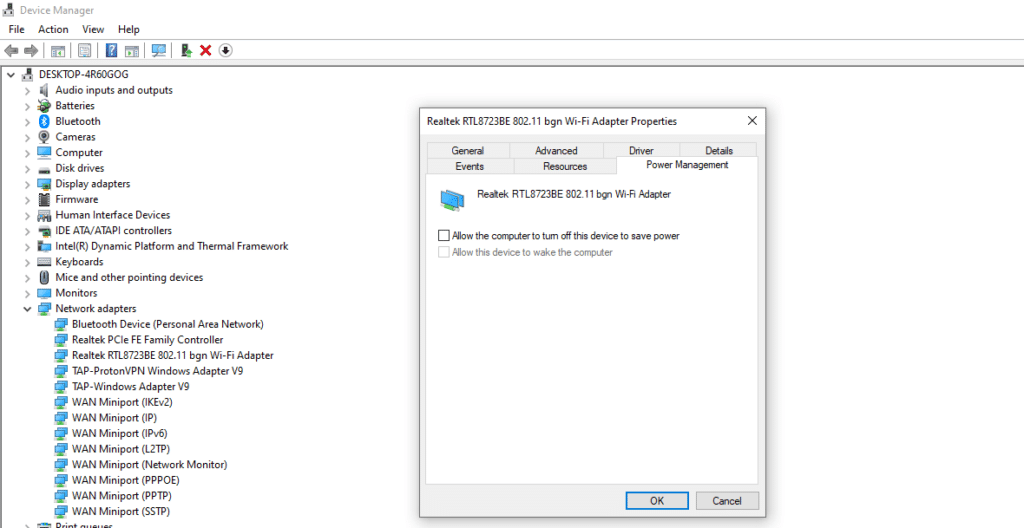
If it is unchecked, do not bother about the networks to which the PC connected earlier.
5. Forget Your Old Networks
Windows PC connects with the fastest wi-fi connection that connected earlier. When you have more than one wi-fi connection, the PC may connect with the previous one. Beyond, the same issue may arise when the so-called connected wi-fi is not stable. In those situations, the connection may move from one to the other. Truly, it will be embarrassing for you to work online.
REFER:
Forget A Wi-Fi Network on Windows 10
Here, you better choose one firm connection to work with. Try to grab the best connection which avoids the issues. Due to the information regarding the previously used wi-fi connection being saved in the PC, you may surf the internet using it. So, you better forget the networks that you do not use now.
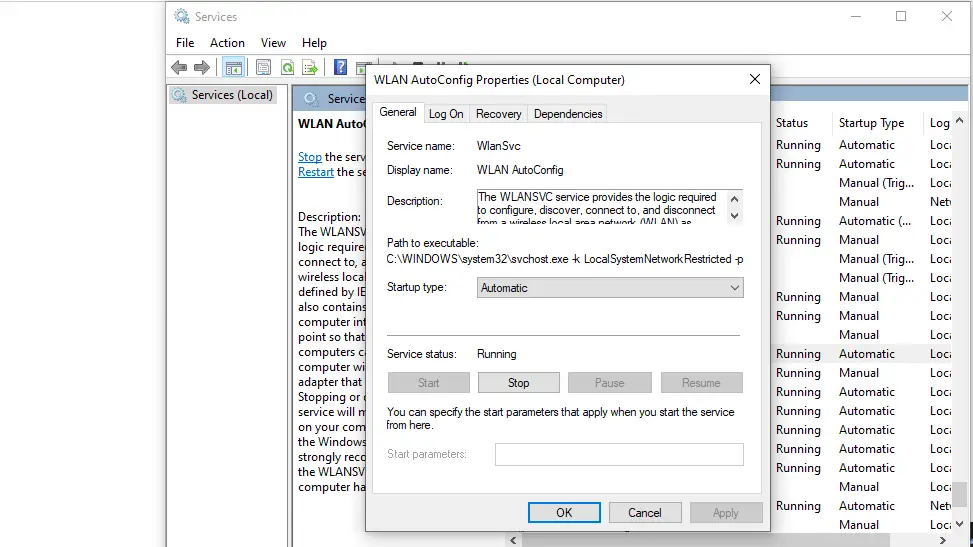
6. Reset the Wi-Fi Auto-Config service
Normally, windows have a feature of, WLAN Auto-Config that connects the PC with the preferred network when it is free. What happens if the setting is turned off? You have to connect the PC to the internet. This is based on the manual method. It does not matter if you include the password.
When you reset the so-called setting, the network will be back to having an automatic connection. Let us move to the steps to set it:
- Press Win + R. the run dialogue bow will open.
- Type “services.msc”. then, tap on ok.
- Look for the option, WLAN AutoConfig, and double-tap on it.
- Navigate to the dropdown menu and tap on Automatic
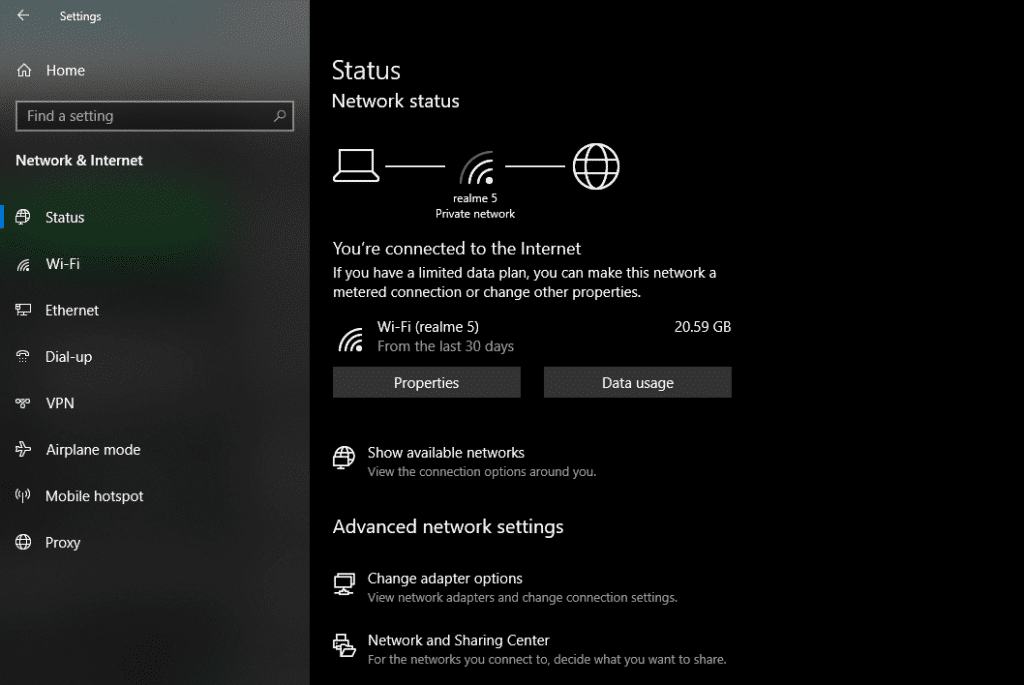
7. Switch DNS Server
Commonly, this type of issue may not arise due to the DNS server. But it will be good enough to look for it. Further, you better alter the server and check it. Here we show you the path to connect the Google DNS server with your DNS server. For sure, it will enhance the internet connection firmly.
- Navigate to the settings.
- Go to network and internet.
- Look for Advanced network settings and finally go to change adapter options.
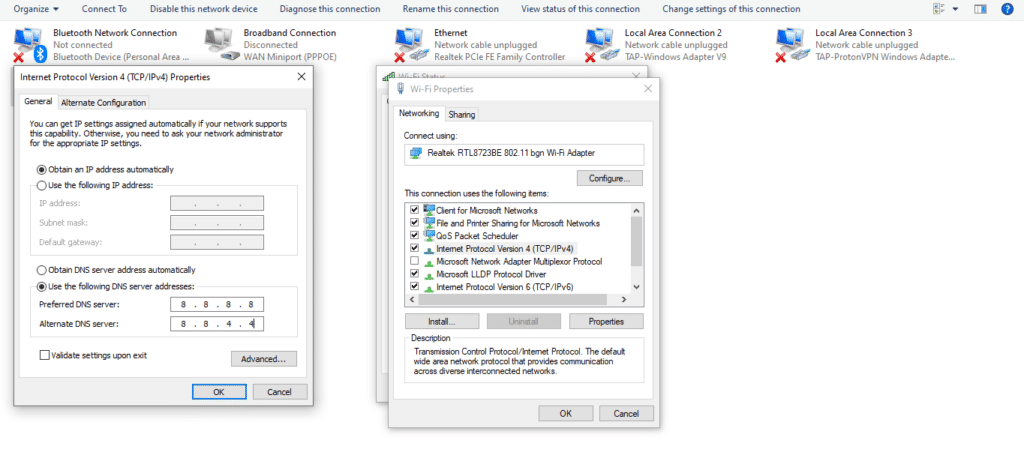
- Choose your network adapter. The list will appear.
- Navigate to properties. Double-tap on Internet Protocol Version 4 (TCP/IPv4).
- Look for the option Use the following DNS server addresses.
- Make changes in Preferred and Alternate DNS server as follow: 8 8 8 8 and 8 8 4 4
8. Run Network Troubleshooter
So far, we bring you a list of tips to solve the issue. In case, if none of them work well, you can perform a Windows network troubleshooter at last. The very tool may come with the identification of the issue by solving it. Let us see how to perform it on windows 10.
- Go to settings.
- Look for Updates and Security.
- Tap on Troubleshoot display in the left sidebar.
- Tap on Additional troubleshooters.
- Look for Internet Connections and tap to Run the troubleshooter.
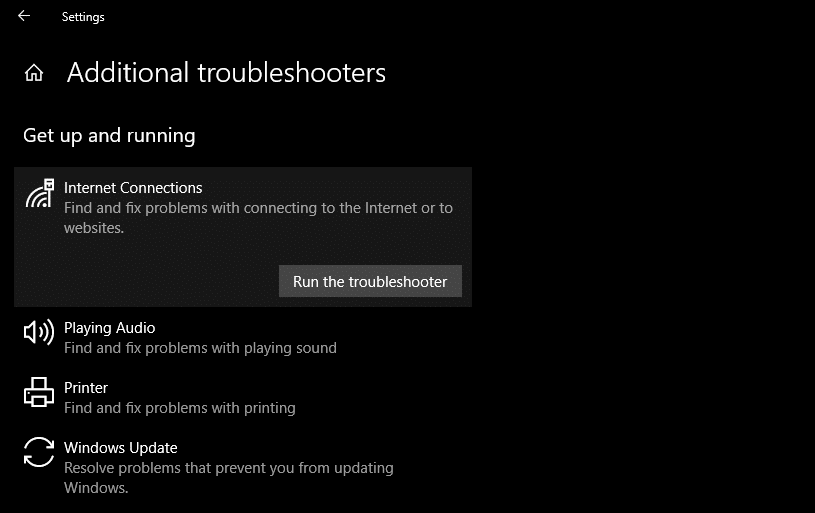
Furthermore, navigate to settings in Additional troubleshooter. Choose both Incoming Connections and Network Adapter to perform the troubleshooter.
Help Your Network Connection Breathe Again
Most probably, the enlisted methods would be useful to avoid the issue of wi-fi connection. But if the same issue prevails make a phone call to the network provider. Sometimes, the error would be in the hardware.
In wrap-up, we advise you to check if anyone is logged into your network and surfed on the internet. Check it at least weekly for your own safety.
Lucas Noah, with a Bachelor of Information Technology (BIT) degree, is a prolific writer known for his expertise in the tech world. Currently, he brings his wealth of knowledge to Creative Outrank LLC and Oceana Express LLC, enriching their websites with hi... Read more