2 Possible ways to Install Magisk and Root Android Devices

2 Possible ways to Install Magisk and Roor Android Devices
We guide you to modify the software by”Magisk” on an Android device without any system. If you wish to install third-party apps on your device, you have to think in a positive way. Following instructions herewith leads you to install Magisk on any desired device of your choice from version 4.2 to Android 10. You may be getting familiar with Android at the moment, In that case, spare some time to get satisfactory awareness of its mean and the features within there. This will make you a better understanding of how to install Magisk and root Android devices.
What is really Magisk?

Magisk is an influential tool, do the work of rooting their Android device. However, it has the ability to modify the software excluding the system. Topjohnwu, XDA recognised developer expands “Magisk” and he is one of the leading founders of SuperSU presenting more and more advanced features with high qualities to Android.
Modules like”Xposed Framework, Magisk arose representing a tool for modifications on Android in 2016. However, in an advanced manner. The special feature of Magisk, compared with Xposed, is it lets the user customize the software with no changes in system partitions as a matter of fact. In that case, no issues arising with users as they are able to pass Google’s safety Net test with all the apps believes on the software.
With advancements, Magisk added special features like”MagiskSU“. it comes as a part of the tool itself for better performance in rooting. Currently, If you want to root by Magisk with any kind of Android versions such as 10, Nougat, Oreo, Marshmallow or Lollipop.
Another significant feature of the Magisk is”Magisk Hide“. Its main role is to hide the root from the app, in case of detecting the app, it will not work as Google Pay, Pokemon Go or banking apps.
Following are the main features of Magisk
- Modifications and alterations are possible without interfering the system.
- With the hepl of open-sourse root settlemts, root any device.
- Ability to manage root permissions as well as biometrics like fingerprint, face unlock in order to grant superuser permissions.
- Highly used in bank porposes nad security applications on rooted devices.
- Removing kernal features as DM-Verity nad ForceEncrypt.
- Magisk Modules allows to add third-party features.
- Installation of OTA updates on your rooted Android device with ease.
With a clear understanding of modifying the software of your Android phone, you better try Magisk as a solution.
Preconditions
- It is always advisable to have a backup of yuor all personal storage consisting all tha data. Follow our guidelines how to backup Android devices.
- Keep your bootloader unlocked on your Android device.If you are looking for some instructions forthe official OEM portals or look for device specific tutorials from our atchive
- You have to download and install the latest USB drives for your OEM Android device on the PC.
- Method 1- Make sure you have the latest TWRP recovery installed on your Android phone.
- Method 2- A. You have to download the latest Android SDK platform-tools package and install it on your PC
B. If you are asked to launch the command-line window on the PCfollow the below instructions.
a. For Windows- Find the folder, where platform tools are there. (E.g. C:platform-tools). After that, you have to hold the SHIFT key on the keyboard and right-click on any empty space inside the folder as you see. Now select, ‘Open PowerShell window here” option.
b. For macOS/Linux: You have to open the terminal in order to change its directory(have to use ‘cd command) to the folder In which the Android SDK platform-tools are installed. (E.g.-Documents/platform-tools).
cd Documents/platform-tools
- Keep in mind that, for method 2 stock boot image must be in pocession form the stock firmware.with matching the current firmware installed on your device.There are several ways to reach it. You can find it on firmware.mobi(database by SuperSU creator’Chainfire). Otherwise you can visit device- specific section on the XDA-Developers forum, or else you can download the full OTA package of the installed siftware, then extract the Payload.bin file. in it recieve the boot image.
Installation of Magisk on your Android
In the beginning, we mentioned to you that there are two different ways to install Magisk on Android devices. The first one is easy, by flashing the latest Magisk installer ZIP files with the use of TWRP.
Even though you need to root but TWRP recovery is not available you have to try for the second option. It is done by patching the stock boot image with the usage of Magisk. Then, you have to flash the Magisk patched boot image to your Android device through the fast bot. This is considered a useful method as it let you install OTA updates easily on your Android phone.
Below mentioned instructions have covered both the methods in a clear way, step by step for you to understand.
FIRST METHOD : Flash the Magisk Installer with use of TWRP recovery
- You have to download the latest Magisk installer zip; Download link
- Now, connect your phone to the PC by using the USB cable in order to enable MTP/File transfer mode.
- Then,copy the download Magisk zip file (e.g.Magisk-v20.3 zip)to the phone’s internal storage or else top SD card.
- Now, you have to use relevant key combinations to boot your Android device into TWRP recovery
- On the other hand you can use the following ADB commands while your device is connected to USB debugging enabled –
adb reboot recovery - Now tap on “Install” in the TWRP main screen
- Search for phone’s internal/external storage and select”Magisk installer zip file(e.g. Magisk-v20.3zip)
8. The file is already added to the TWRP flashing queue.
9. Thereafter, swipe until the bottom of the screen to flash the relevant file and install Magisk on your phone.
10. When finished the completion of flashing, touch”Reboot system”
With the rooting process, Magisk is able to patches or disables kind of kernel-level security attributes( just like DM-verity) at the same time. It will avert your Android device from booting, even though the software is modified.
- First,Get the stock boot image for the current firmware installed on your Android phone.
- Then, transfer the boot image file into the phone’s external or internal storage.
- Now, download the latest Magisk Manager APK file from here. then, install it on your smartphone.
- Time to go to the app drawer to launch the ‘Magisk Manager’ app.
- Then, tap on the ‘install’ and choose ‘install’ again
6. After that’ Select and Patch a File’ option.
7. Go to storage, then select the stock boot image file(e.g. boot.img). You have transferred it earlier.
8. According to the latest version of Magisk, Magisk Manager will patch the stock boot image clearly.
9. When you finished patching, the patched boot image (Magisk_patched.img) file is already in your download folder.
10. Now, transfer the aftermath file from the phone’s storage to the place of Android platform-tools installation.
11. Then, boot your Android device into Bootloader/Fastboot mode and have to connect it to the PC by a USB cable.
12. After that, launch the command-line window such as PowerShell in Windows or Terminal in macOS/Linux on your PC.
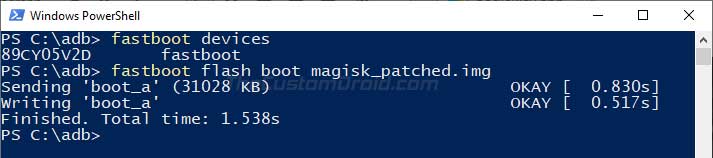
13. Now, enter the following command in the PowerShell window to make sure that your Android phone is being detected in the right manner with Fast boot.
fastboot devices
14. As a final step, Give the following command in order to flash the patched boot image and install Magisk on your Android Phone.
fastboot flash boot magisk_patched.img
15. N.B. The Magisk patched boot image will be flashed to your phone’s current active position.
After processed, you have to reboot your phone with the following command
fastboot reboot
In order to verify the installation, open the Magisk Manager, when your phone boots. You can download many kinds of modules from the official magazine here. It is better to know what Magisk can do with the official documentation describing the initial levels.
Guidelines to Complete Uninstallation of Magisk to unroot your Android device
If you have any idea of removing Magisk, check the following steps and they will help you a lot. With the help of the Magisk Manager app is the most straightforward way to uninstall it. But, you have to disable and remove all the modules first before uninstalling Magisk. After doing that do the following.
- First, launch the ‘Magisk Manager app on your device.
- Search for ‘Uninstall’ option in the main screen.
- Uninstall prompt will be shown on the screen
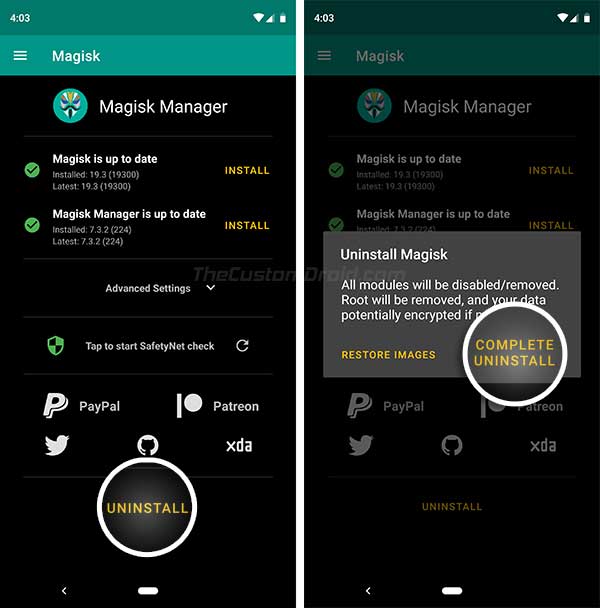
4. As a final step, select, Complete Uninstall’ then restore the stock boot image.
5. When finished with the whole process, reboot your device.
After finished booting, you can safely remove the Magisk Manager app also.
We can recommend a substitute for the above method as flashing the Magisk Uninstaller zip with the use of TWRP recovery or by a simple restore of the stock image in case of using method 2.
TO SUM UP
For better customization of the software, Magisk enables you to launch vivid actions for you. You are free to use any kind of root-enabled apps on your device. In addition, Magisk let you hide root from apps ( like Pokeman Go,). Not only that, but you can also install modules to add third-party attributes to the software as well. A long-range of positive features are there for your convenience with Magisk. Experience yourself for better understanding.
We appreciate your comments below on our guides on how to install Magisk on Android and root it.
Lucas Noah, with a Bachelor of Information Technology (BIT) degree, is a prolific writer known for his expertise in the tech world. Currently, he brings his wealth of knowledge to Creative Outrank LLC and Oceana Express LLC, enriching their websites with hi... Read more